Live Edge Wood Epoxy Table: Complete 2025 DIY Guide & Plans
A live edge wood epoxy table combines natural wood beauty with modern epoxy resin technology, creating stunning furniture pieces that showcase nature’s raw elegance. These tables feature the natural bark edge of wood slabs filled with clear or colored epoxy resin, producing unique grain patterns and organic shapes. With proper techniques and materials, you can create professional-quality epoxy resin tables that rival expensive commercial pieces while saving thousands of dollars.
Understanding Live Edge Wood Epoxy Tables
Live edge furniture represents one of the fastest-growing trends in American home design, with live edge wood epoxy tables leading the market in 2024-2025. These pieces preserve the natural edge of wood slabs, including bark and irregular contours, while epoxy resin fills voids, cracks, and creates river-like channels between wood pieces. The combination creates functional art that brings organic beauty into modern living spaces.
The popularity of epoxy resin tables has surged 340% since 2020, driven by DIY culture and sustainable furniture trends. Unlike traditional tables, live edge pieces showcase natural imperfections as design features, making each table completely unique. The epoxy component provides durability, water resistance, and creative possibilities through colors, embedded objects, or special effects.
Types of Live Edge Epoxy Tables
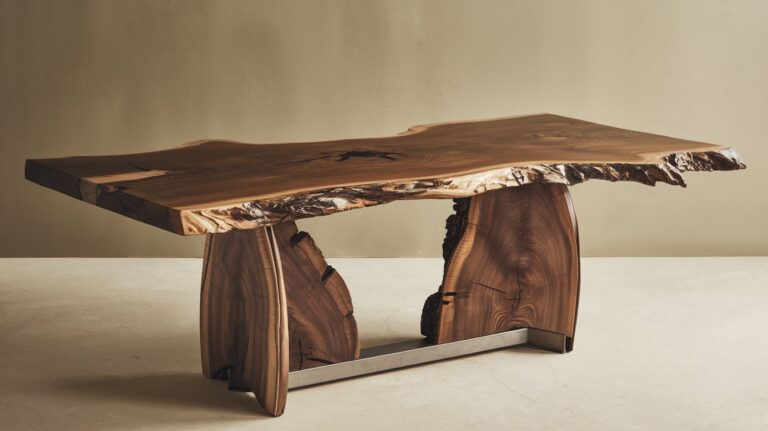
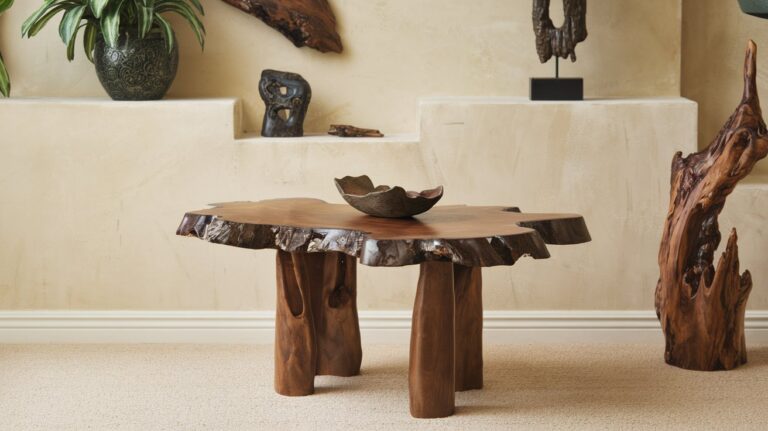
Live edge coffee tables represent the most popular category, typically ranging from 16-18 inches in height and featuring single or dual slab construction. River tables use two wood pieces separated by an epoxy channel, while full-pour tables embed entire wood sections within epoxy resin. Dining tables require larger slabs and additional structural support, making them more complex but highly rewarding projects.
Market Demand and Pricing
Commercial live edge wood epoxy tables for sale typically range from $1,200 to $8,500 depending on size, wood species, and craftsmanship quality. DIY projects can achieve similar results for $300-800 in materials, representing significant savings while providing customization options unavailable in retail furniture. The growing demand has created a robust market for both finished pieces and raw materials.
Essential Materials and Tools for Live Edge Tables
Success in creating live edge wood epoxy tables depends heavily on material selection and proper tooling. Wood species like walnut, cherry, oak, and exotic hardwoods provide the best results due to their density and grain patterns. Epoxy resin quality directly impacts final appearance and durability, making premium products essential for professional results.
Professional-grade epoxy resin table kits include measured resin and hardener ratios, pigments, and detailed instructions. However, purchasing components separately often provides better value and flexibility. A typical project requires 1-3 gallons of epoxy depending on table size and void volume, plus additional materials for sealing and finishing.
Wood Selection Criteria
Choosing the right wood determines both appearance and longevity of your live edge wood epoxy table. Kiln-dried lumber with moisture content below 8% prevents cracking and warping after epoxy curing. Avoid wood with extensive rot, loose bark, or structural damage that could compromise integrity. Premium hardwoods cost more but provide superior grain patterns and durability.
Epoxy Resin Selection Guide
The best epoxy for live edge tables offers slow cure times, minimal bubbling, and high clarity retention. Table-top epoxy formulations provide thicker pour capabilities and extended working time compared to standard epoxy. UV-resistant formulas prevent yellowing over time, essential for long-term appearance. Popular brands include EpoxyPlus, ArtResin, and EnviroTex Lite for different project requirements.
How to Prep Live Edge Wood for Epoxy Application
Proper wood preparation determines epoxy adhesion quality and final appearance in live edge wood epoxy tables. The process begins with moisture content testing, followed by thorough cleaning, bark stabilization, and surface preparation. Each step requires attention to detail and appropriate techniques to ensure professional results.
Wood preparation typically takes 2-3 days including drying time between steps. Rushing this process leads to poor epoxy adhesion, air bubbles, and potential delamination. Professional woodworkers emphasize preparation as the most critical phase of epoxy table construction, often spending more time on prep than actual epoxy pouring.
Bark Stabilization Techniques
Learning how to epoxy live edge wood with bark requires understanding bark attachment methods. Loose bark must be removed or properly secured using thin CA glue or diluted epoxy. Some species like cedar and oak hold bark naturally, while others like cherry and maple require intervention. Test bark adhesion by gently pulling sections before proceeding with epoxy work.
Surface Preparation Methods
Surface preparation for live edge wood epoxy tables involves progressive sanding from 80-grit to 220-grit, removing mill marks and achieving smooth surfaces. Clean all dust using compressed air and tack cloths between grits. Seal end grain and porous areas with diluted epoxy to prevent excessive absorption during main pour applications.
Step-by-Step Epoxy Table Construction Process
Building live edge wood epoxy tables follows a systematic process that ensures professional results and durability. The construction timeline typically spans 7-10 days including curing periods, with active work time representing approximately 20-30 hours. Each phase builds upon previous steps, making thorough completion essential before advancing.
Temperature and humidity control significantly impact epoxy curing and final quality. Ideal working conditions include 70-75°F temperatures and 30-50% relative humidity. Many builders construct climate-controlled work areas or time projects during favorable weather conditions to optimize epoxy resin table outcomes.
Creating the Mold System
Professional live edge wood epoxy table construction requires precise mold systems to contain liquid epoxy during curing. Melamine-faced particleboard provides smooth, non-stick surfaces ideal for table bottoms. Seal all joints with high-quality caulk and apply mold release agents to prevent epoxy adhesion to containment surfaces.
Epoxy Mixing and Pouring Techniques
Achieving bubble-free results in epoxy resin tables requires proper mixing ratios, thorough blending, and controlled pouring techniques. Mix small batches to manage working time and temperature buildup. Pour in thin layers for thick applications, allowing each layer to reach gel stage before adding subsequent pours.
Common Challenges and Solutions
Understanding the disadvantages of epoxy tables helps builders prepare for potential issues and implement preventive measures. Common challenges include air bubbles, temperature-related problems, adhesion failures, and finishing difficulties. Each issue has specific causes and proven solutions when addressed systematically.
Heat generation during epoxy curing represents the most significant challenge in live edge wood epoxy table construction. Large pours can reach temperatures exceeding 200°F, causing cracking, warping, or complete failure. Professional builders use staged pouring techniques, heat sinks, and cooling methods to manage exothermic reactions effectively.
Bubble Prevention and Removal
Air bubbles in epoxy resin tables result from trapped air, moisture, or improper mixing techniques. Prevention includes thorough degassing, proper mixing ratios, and appropriate pouring methods. Heat guns, propane torches, and pressure chambers effectively remove surface bubbles during early curing stages.
Temperature Management Strategies
Controlling temperature during live edge wood epoxy table construction prevents cracking and ensures proper curing. Use aluminum heat sinks, cooling fans, and insulation methods to manage exothermic reactions. Monitor internal temperatures with digital thermometers and adjust pour schedules based on ambient conditions.
Finishing and Maintenance Requirements
Proper finishing transforms raw live edge wood epoxy tables into furniture-quality pieces that resist wear and maintain appearance over decades. The finishing process includes progressive sanding, defect repair, protective coating application, and final polishing. Quality finishing often distinguishes professional results from amateur attempts.
Maintenance requirements for epoxy resin tables remain minimal when properly finished and cared for. Regular cleaning with appropriate products, protection from extreme temperatures, and periodic re-polishing maintain appearance and functionality. Well-maintained pieces can last 50+ years while retaining their original beauty and structural integrity.
Cost Analysis and Project Planning
Budget planning for live edge wood epoxy tables varies significantly based on size, wood species, and desired features. Material costs typically range from $300-800 for coffee tables and $600-1,500 for dining tables, not including tools or equipment. Labor investment ranges from 20-40 hours depending on complexity and experience level.
Sourcing materials locally reduces costs and supports regional suppliers, with many areas offering live edge wood epoxy table near me options through sawmills, lumber yards, and specialty woodworking suppliers. Bulk purchasing of epoxy resin provides significant savings for multiple projects or large tables requiring substantial resin volumes.
Design Variations and Creative Options
Modern live edge wood epoxy table designs extend far beyond basic river tables, incorporating LED lighting, metallic pigments, embedded objects, and complex geometric patterns. Creative options include glow-in-the-dark additives, crushed glass inclusions, and multi-colored epoxy systems that create artistic effects while maintaining functionality.
Custom live edge coffee table designs can incorporate storage compartments, integrated charging stations, or convertible features that maximize utility in modern homes. Advanced builders experiment with curved forms, sculptural bases, and mixed-material combinations that push traditional furniture boundaries while maintaining structural integrity and practical usability.
Related video about live edge wood epoxy table
This video complements the article information with a practical visual demonstration.
FAQ – Common Questions
How to prep live edge wood for epoxy application?
Proper preparation involves testing moisture content below 8%, cleaning all surfaces, stabilizing loose bark with CA glue or diluted epoxy, progressive sanding from 80-220 grit, and sealing porous end grain. Allow 2-3 days for complete preparation including drying time between steps. Clean all dust thoroughly before epoxy application to ensure proper adhesion.
What are the main disadvantages of epoxy tables?
Primary disadvantages include high material costs ($300-800 for materials), long construction time (7-10 days including curing), sensitivity to temperature during construction, potential for air bubbles, and difficulty repairing damage. Heat generation during curing can cause cracking if not properly managed through staged pouring techniques.
What is the best epoxy resin for live edge wood tables?
Table-top specific epoxy resins like EpoxyPlus, ArtResin, and EnviroTex Lite offer optimal results with slow cure times, minimal bubbling, and UV resistance. These formulations provide thicker pour capabilities and extended working time compared to standard epoxy. Choose UV-resistant formulas to prevent yellowing over time.
Why is live edge wood so expensive?
Live edge wood costs reflect several factors: specialized sawmill equipment for large slabs, extensive kiln drying time (6-12 months), high waste rates during processing, limited availability of quality specimens, and growing market demand. Premium species like walnut can cost $15-25 per board foot compared to $3-8 for standard lumber.
How long does it take to build a live edge epoxy table?
Complete construction requires 7-10 days including epoxy curing time, with 20-30 hours of active work. Preparation takes 1-2 days, epoxy pouring and initial cure requires 2-3 days, and finishing work needs 2-3 additional days. Weather conditions and project complexity can extend timelines significantly.
Can you repair damaged epoxy on live edge tables?
Minor scratches and small chips can be repaired through progressive sanding and re-coating with matching epoxy. Deep gouges or cracks require cutting out damaged sections and filling with new epoxy, followed by complete refinishing. Prevention through proper use and maintenance is more effective than repair attempts.
| Key Aspect | Important Details | Benefit |
|---|---|---|
| Material Cost | $300-800 for coffee tables, $600-1500 for dining tables | 60-70% savings vs commercial pieces |
| Construction Time | 7-10 days total, 20-30 hours active work | Flexible scheduling around curing periods |
| Durability | 50+ year lifespan with proper finishing | Superior to mass-produced furniture |
| Customization | Unlimited design options, colors, effects | Unique pieces unavailable commercially |